You don’t spend your entire day in the kitchen, but it’s the only place you prepare food to stay alive, right? Well, that’s why a kitchen shouldn’t be all messy and misarranged. The vibe you get from the moment you enter your kitchen should be mesmerizing and mind-refreshing.
Among hundreds of things you can do to rearrange your cooking-place is to place some racks or shelves on the wall. You can put the pans, cans, bottles, and many other cooking appliances on the shelves to save space and reach out quickly.
What can be a better way to do it yourself? Nothing! That’s why today, we will be showing the most effortless way how to build kitchen shelves! Stay tuned!
How to build kitchen shelves for your kitchen
Before you get started with the jigsaws and all, devise a complete plan of what you’re going to do. Pick a space on your kitchen wall that suits the best for a shelf.
Once you’ve identified and dedicated a place for it, you are ready to move.
Things that you will need to build open kitchen shelves
- Wooden plank
- Jigsaw/ reciprocating saw for cut the wooden plank
- Nail, screw
- Hammer, screwdriver
- Drill machine to drill holes in the wall
- Royal plug for nailing on the wall
- Iron angle to place the plank on the wall
Step 01: Measure the Potential Shelf Area
First thing’s first, you need to take the proper measurements of the shelf. It is going to be too low that you can easily reach the top while just standing? Or do you want to stretch your hands a bit more to reach the upper portion of the rack?
How long do you want the shelf to be? Is there enough space for that? Measure the width, as well. Make sure the width doesn’t come too close to your body so that it may hit your head!
Step 02: Prepare the Wood
Usually, if you are relatively new to the field of crafting wood, you may resort to common lumber, premade boards, or even reclaimed wood for your shelf. Take the proper pieces of wood that suit your need and apply the measurements you took before.
Although some wood-stores offer you well-prepared shelf wood, it’s better to work on your own. A few stores even have cutting facilities, but that’s not a good option if you’re customizing your kitchen by yourself.
Once you’ve finished outlining the lumber measurements, it’s time to use some cutting tools!
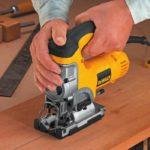
Step 03: Cut and reshape the wood
In the third step how to build kitchen shelves the wooden planks should be cut according to the side of your kitchen walls.
You can use a reciprocating saw to cut off the extra portions on the outer side of the piece of wood. A power saw can easily help you get rid of those areas that you don’t need. Simply put, the saw blades in the position from where you want the cutting to start. Remember, you should have a perfect reciprocating saw blade for wood cutting for the task.
You need to remember that you need to have the right wood cutting blade to do this task. Unnecessary pieces of wood will ruin the beauty of your kitchen. So it is necessary to use the perfect size of lumber.

Turn the Start button on and keep moving the blade forward and backward to cut through the wooden frame. Within a few minutes, you will find a proper wood piece for the shelf.
As for fine-tuning the edges of the wood-piece, use a proper functional jigsaw. It will help you shape out the perfect shelf wood.
Step 04: Find the Perfect Shelf Bracket
Without the proper brackets, it’s almost of no use to have wooden sheets. Brackets work as the only significant support to the wood-piece. Although they come in different shapes, they all do the same work.
There are usually three types of shelf Bracket you can find - L, Z, and J brackets. These letters represent the shapes these brackets come with. While the L bracket is the simplest one of these three, the other two are a bit more secured, especially if you’re planning to build a floating kitchen shelf.
Choose any of the three that suits the best for your kitchen and the safety you want. Count the areas where you need to place a bracket. Usually, the number varies from 2 to 4; it’s up to the design you’re using for the rack.

Step 05: All about drilling and nailing
Finally, mark the drilling spots on the wall and the wood. Drill properly and place the brackets on the wall. Then install the wood shelf with the brackets and nail in the screws and nails for the final touch.
That’s it! You just made your very own kitchen shelf!

Kitchen shelves - How to Keep Your Kitchen Tidy
We have discussed how to build kitchen shelves above the article. Of course kitchen rack or shelves is a necessary accessory of your kitchen, stay with us to know how it keeps your kitchen clean.
The moment you have decided to build an open kitchen shelf rack, you already went one step ahead in organizing your kitchen.
Now that the kitchen shelves is ready, you can still give it some final tidy touch to organize more. Divide the shelf’s space into different categories. The upper shelf should be dedicated to glass-made bottles and cans. Plus, you can keep these bottles that are hardly used regularly.
Next, the lower shelf can be used to keep regularly-used appliances - such as coffee pots, sugar, milk holders, and other things that need frequent access. Use steel hooks under the top shelf to hang glass, mugs, etc. hanging to save more space. It looks great, as well.
Kitchen Rack - Arrange the Kitchen Utensils Easily
So, what to do with the utensils, you may ask. There are some great tricks you can apply here. The wall beneath the shelf or the wall between the two shelves is often left unused. Just nail the wall with a few nails and screws.
You can hang the spoons, pans, and other utensils from the hooks and nails easily. It will save a lot of space, as well.
Final Words
Most of us indeed put a lot of effort into organizing and re-arranging our living rooms or bedrooms but pay little attention to our kitchens. This is the place where all our meals are cooked and the only space in the house where our nutritious well-being is decided. Keeping it neat and tidy is something we can hardly ignore.
Using a kitchen rack shelf is one of the easiest and oldest tricks to make the most of the cooking area's open space. It helps a lot in relocating and re-organizing utensils and other kitchen appliances.
So, if you’re planning for a kitchen makeover or simply looking for a shelf to be built, we believe this piece of article will help you in stepping in confidently. Keep it bookmarked in case you need it in the coming days!